Description
These Baked BBQ Chicken Drumsticks are the best choice when you need easy dinner ideas that feel quick and simple yet still taste special. The chicken bakes until tender and juicy then gets brushed with a glossy barbecue glaze for a healthy homemade finish with sticky edges and rich flavor. Great for weeknight dinner or meal prep and just as welcome at a party or potluck when you need a no fuss crowd pleasing main.
Ingredients
- 8 chicken drumsticks
- 1 cup barbecue sauce
- 1 tablespoon olive oil
- 1 tablespoon brown sugar
- 1 teaspoon smoked paprika
- 1 teaspoon garlic powder
- 1 teaspoon onion powder
- 1 teaspoon kosher salt
- 1/2 teaspoon black pepper
- 1 tablespoon apple cider vinegar
- 1 tablespoon chopped parsley
Instructions
- Pat the drumsticks dry and then rub them with olive oil and smoked paprika and garlic powder and onion powder and salt and black pepper until the skin looks lightly coated and slightly glossy. The chicken should still look raw yet now the surface turns deeper red and golden in uneven patches and the seasonings cling in a natural scattered way with some thicker spots and some thinner spots. Arrange the 8 drumsticks with loose spacing so they are not touching too neatly. Let the seasoning sit on the skin just long enough for the color to settle and for the pieces to look casually coated rather than perfectly uniform.
- Stir the barbecue sauce with brown sugar and apple cider vinegar until it looks smoother and slightly looser and then brush part of it over the seasoned drumsticks. The chicken changes from dry seasoned pieces to sticky coated pieces with streaks of dark red brown sauce and a few exposed spice spots still showing through. Do not drown the chicken in sauce at this point. A partial coating looks more natural and it helps the glaze bake onto the surface while keeping the pieces visibly distinct from one another.
- As the drumsticks bake the skin tightens and the glaze begins to set into darker glossy patches. The meat looks more structured and the sauce clings more closely to the surface while small caramelized spots appear around the edges and the exposed areas of skin begin to turn golden. The pieces should not sit in identical lines. Let them look slightly shifted and irregular with a few tips leaning inward and a few turned outward so the tray feels like real home cooking rather than staged food.
- Turn the drumsticks so the underside now faces up and brush on the remaining sauce. This creates a clear visual change because the paler side now shows and then quickly becomes coated with a fresh shiny layer while browned spots from the first bake peek through along the edges and at the ends. The chicken should look more lacquered now with darker glaze gathering in some creases and lighter streaks on curved areas. A few pieces can touch lightly and a few can sit apart so the tray keeps a loose casual look.
- Return the drumsticks to bake until the glaze turns thick and sticky and the skin shows deeper browning. The color becomes more varied with dark mahogany patches and amber edges and a few blistered areas where the sauce caramelizes faster than the rest. This is the stage where the dish starts to look finished and homemade. The texture should be uneven in the best way with glossy spots and rougher baked patches and the pieces should sit in a casual pattern with small gaps and slight overlap.
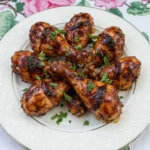
- Transfer the drumsticks to a white plate and scatter chopped parsley over the top for a fresh green contrast against the dark glaze. The final plated dish looks glossy and richly browned with natural imperfections and uneven textures and a few darker edges that make it feel warm and ready to eat. Stack the pieces loosely rather than in a tight pattern so some ends angle outward and some rest against each other. That relaxed arrangement makes the chicken look juicy and homemade and it also shows off the sticky glaze from multiple sides.
Notes
Pro Tips:
- Pat the drumsticks dry before seasoning so the skin browns better.
- Save part of the sauce for the second glaze so the finish stays glossy.
- Turn the drumsticks once during baking so both sides color evenly.
- Let the chicken rest briefly before serving so the juices stay in the meat.
Storage: Let the drumsticks cool and then store them in a covered container in the refrigerator for up to 4 days. The glaze will thicken as it chills and the flavor often tastes even better the next day. Reheat in the oven until warmed through so the skin and glaze regain some texture. You can brush on a little extra barbecue sauce before reheating if you want a fresher glossy finish.
- Prep Time: 15 minutes
- Cook Time: 30 minutes
- Category: Dinner
- Cuisine: American
Nutrition
- Serving Size: 1 serving