

Christmas Thumbprint Cookies are a little piece of holiday happiness with buttery edges and bright red jam tucked into the middle. They smell like warm vanilla as they bake. And that first bite gives you tender shortbread followed by a sweet and slightly tart raspberry center. No fancy icing needed. Just a few pantry staples and some time in the kitchen.
When you’re planning christmas cookies for the holidays, it’s nice to have something that looks festive without hours of decorating. These small jam-filled rounds fit right in. They also pair well with our Soft Chocolate Chip Cookies if you’re putting together a mixed cookie box for family or friends. Both are familiar treats with different textures. If you’ve been looking for easy christmas cookies simple enough to make with kids, this recipe is a good place to start.
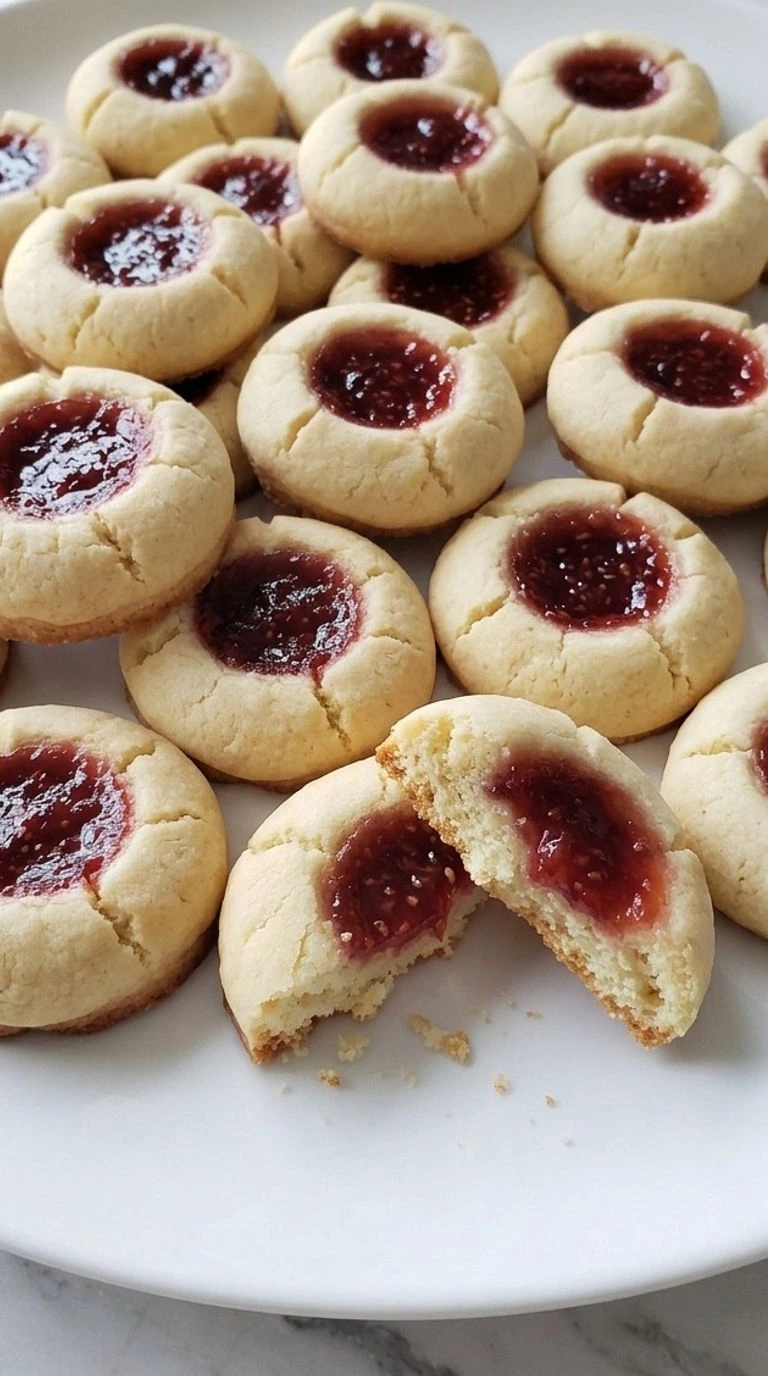
Rolling the dough and pressing the little wells is part of the fun. You can use raspberry preserves for a classic red center or swap in strawberry jam for a milder taste. The short chill before baking helps the rounds keep their shape. So you get homemade cookies that look charming without needing to make every one identical.
Why This Recipe Works
Christmas Thumbprint Cookies get their tender crumb from a small amount of cornstarch mixed with the flour. It weakens the gluten network so the shortbread feels softer when you bite into it.
Chilling the shaped dough for 30 minutes firms the butter before the cookies reach the 350°F oven. The egg yolk adds richness without the extra water from a whole egg.
So the dough holds its small wells without turning cakey. If you enjoy buttery homemade cookies, our Soft Chocolate Chip Cookies offer another soft option for a mixed holiday tray.
Ingredients
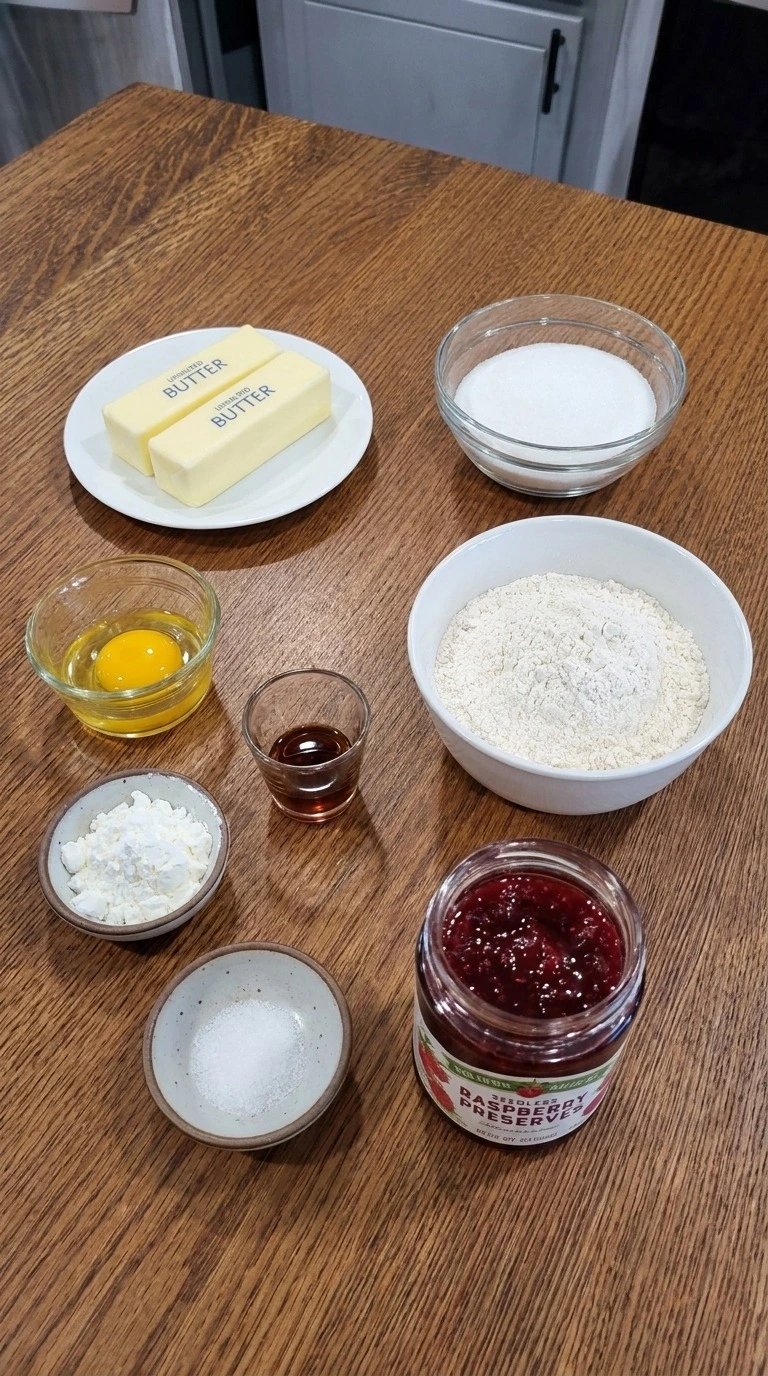
- unsalted butter: Softened to about 65°F for a rich buttery shortbread base.
- granulated white sugar: Adds sweetness and helps create lightly crisp cookie edges.
- large egg yolk: Separated from the white and added for richness and tender texture.
- pure vanilla extract: Adds a warm vanilla aroma that balances the fruit filling.
- all-purpose wheat flour: Measured accurately to provide enough structure for the thumbprint wells.
- cornstarch: Softens the shortbread crumb and reduces toughness.
- fine sea salt: Balances sweetness and brings out the butter flavor.
- seedless raspberry preserves: Thick preserves stirred until smooth and spooned into the cookie centers.
Equipment
- Large mixing bowl: Use a sturdy 3-quart mixing bowl with room for the butter and flour so the dough doesn’t spill while mixing.
- Electric hand mixer: Choose a hand mixer with adjustable speeds so you can cream the butter without overbeating the dough.
- Rubber spatula: A flexible 10-inch rubber spatula folds the flour into the dough and reaches the bowl edges without leaving dry patches.
- Two baking sheets: Use two sturdy 13-by-18-inch baking sheets for 12 cookies each because thin sheets may darken the cookie bottoms too quickly.
- Parchment paper: Choose oven-safe parchment rated to at least 350°F so the preserves don’t stick to the metal baking sheets.
- Half-teaspoon measuring spoon: A rounded half-teaspoon measure creates consistent wells and controls the filling so the jam doesn’t overflow.
- Wire cooling rack: Use a rack at least 10 by 16 inches to allow air beneath the baked cookies and prevent damp bottoms.
- Digital kitchen scale: A scale measuring in 1-gram increments helps divide the dough into even portions so the cookies bake at similar rates.
- Thin cookie spatula: Choose a flexible spatula about 2 inches wide to lift the tender cookies without cracking their edges.
Instructions
Step 1: Cream the Butter and Sugar
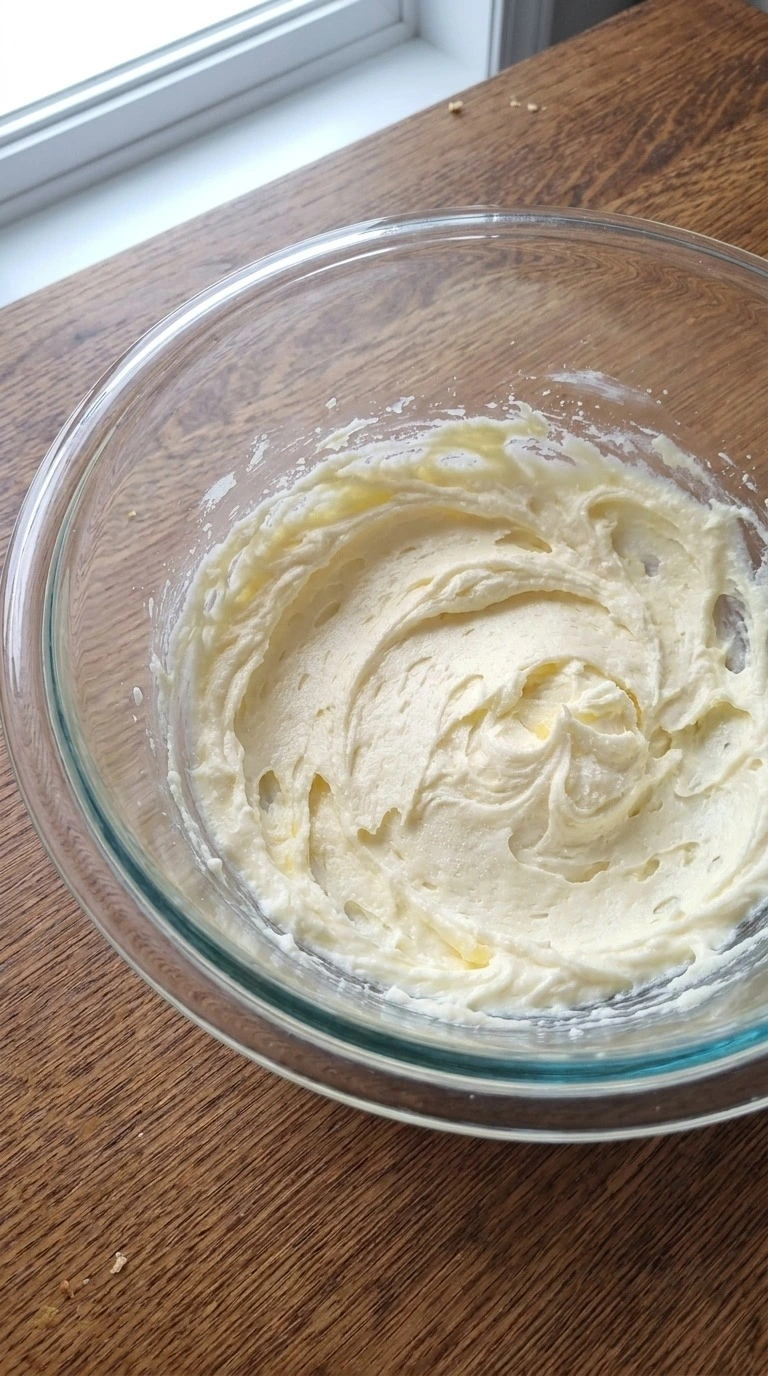
Let the unsalted butter soften for 30 to 45 minutes until it’s about 65°F and yields gently when pressed. Place it in a large mixing bowl with the granulated white sugar. Then beat on medium speed for 2 to 3 minutes until the mixture looks pale and fluffy. Scrape down the bowl halfway through so the butter mixes evenly.
Add the large egg yolk and pure vanilla extract. Beat for another 30 to 45 seconds until the yellow streaks disappear. Don’t keep mixing once everything looks smooth because too much air can cause the cookies to spread. Next look for soft ridges and a creamy ivory color.
The mixture should smell lightly of vanilla and still show a few tiny sugar crystals. That’s normal. Brief creaming keeps the shortbread tender.
Tip: Use butter that holds its shape when pressed. If it looks oily or shiny, chill it for 5 minutes before mixing.
Step 2: Fold the Dry Ingredients Into the Dough
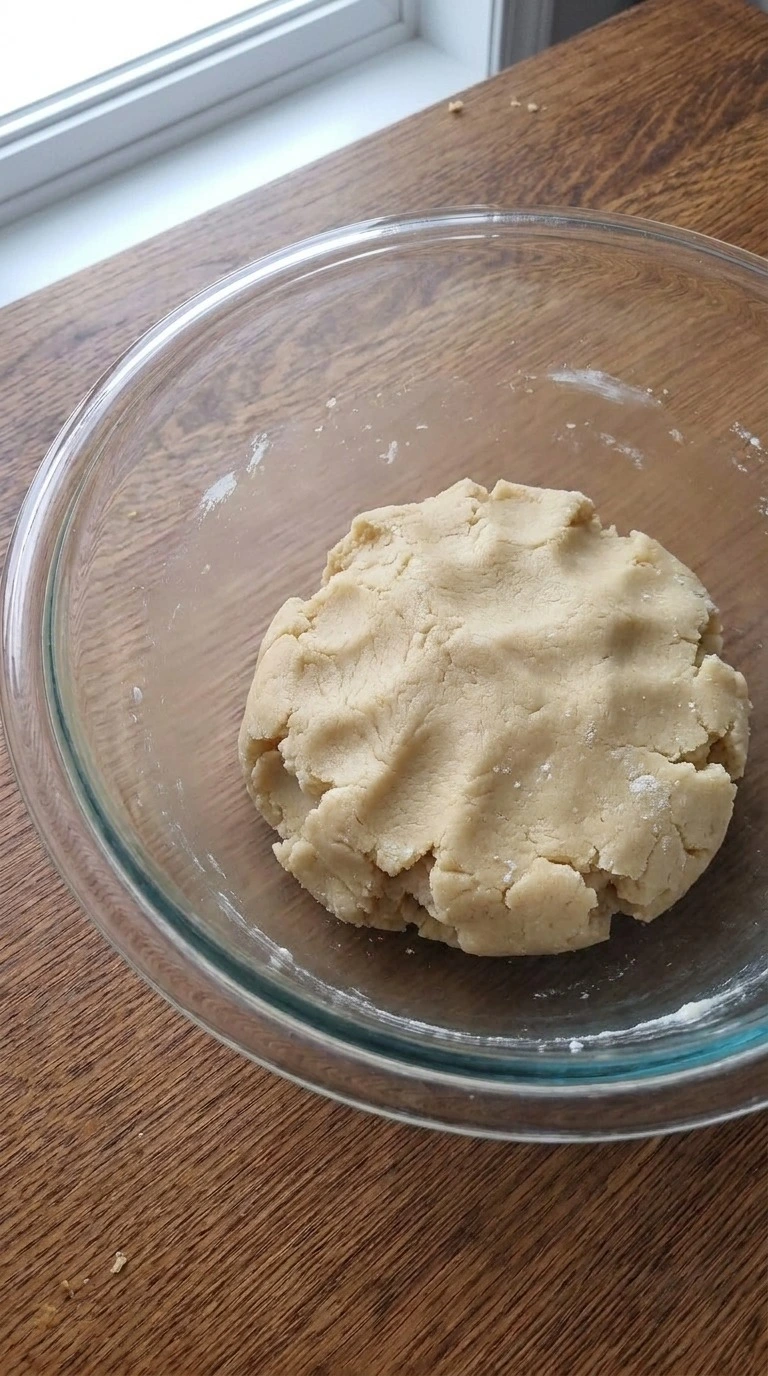
Add the all-purpose wheat flour and cornstarch to the creamed butter mixture. Sprinkle the fine sea salt across the top. Then mix on low speed for 45 to 60 seconds until most of the dry flour blends into soft crumbs. Stop the mixer and fold the mixture with a rubber spatula. Move from the bottom of the bowl toward the center while turning the bowl after each fold.
This takes about 30 to 45 seconds. Keep the dough near 65°F to 70°F. Don’t keep beating once it holds together because the shortbread can become tough. The dough should form a pale beige mound with a few small cracks. It won’t look wet or sticky.
Pinch a piece. It should hold together. Gentle folding limits gluten development and protects the tender crumb.
Tip: Weigh the all-purpose wheat flour at 250 grams for better results. Too much flour makes the dough harder to shape.
Step 3: Shape the Dough and Press the Centers
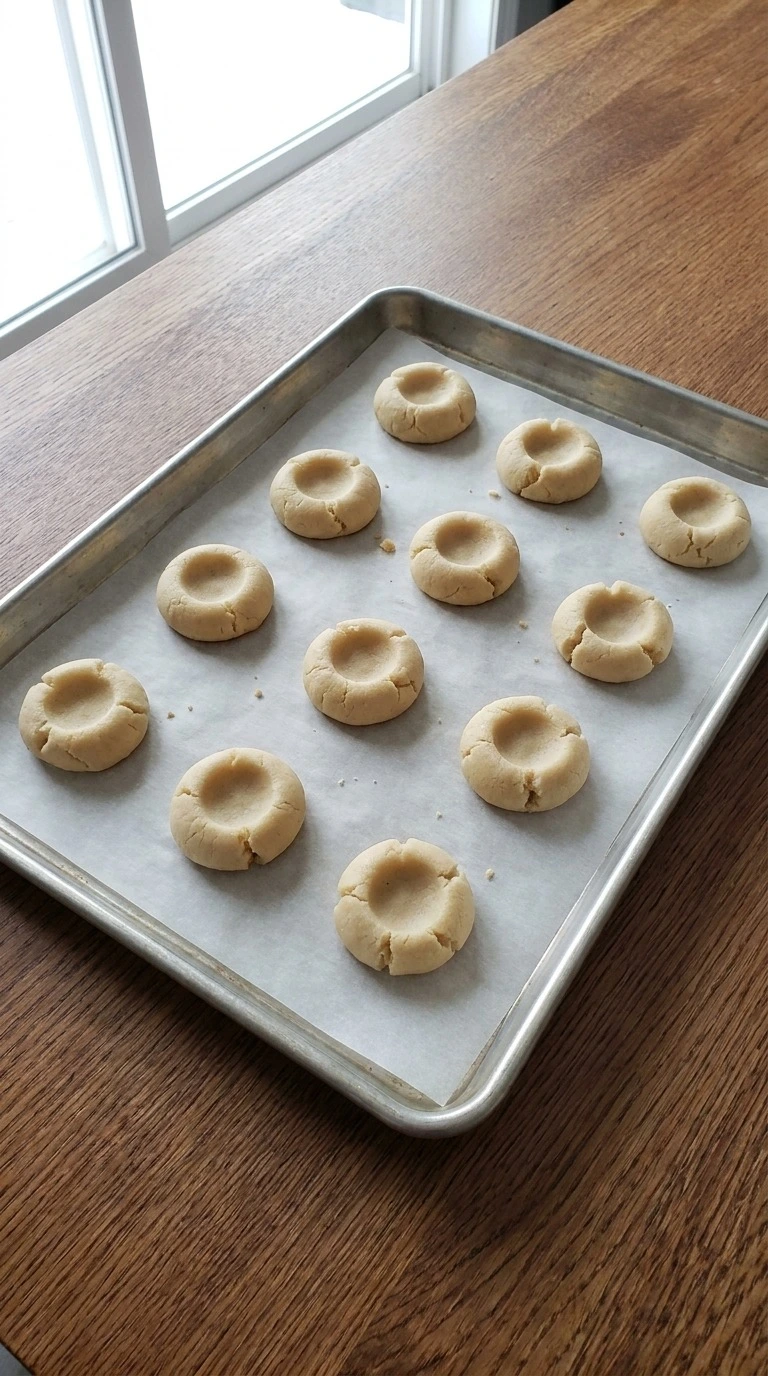
Divide the dough into 24 pieces weighing about 23 grams each. Roll every piece between your palms into a round about 1 1/4 inches wide. Place 12 rounds on each of two parchment-lined baking sheets. Leave about 2 inches between them. Then press the center of each ball with your thumb or the rounded end of a half-teaspoon measure.
Make each hollow about 1/2 inch wide and 1/4 inch deep. Smooth any large cracks with your fingers. Chill the shaped dough at about 38°F for 30 minutes. Warm dough spreads too much and loses its small wells. You’ll see 24 pale rounds with neat little hollows and slightly uneven edges.
A few hairline cracks are fine. (I’ve found that warm dough loses its shape much faster. ) Cold butter helps the rounds hold their form.
Tip: If the dough feels crumbly while rolling, press each portion firmly between your palms for 3 seconds before shaping.
Step 4: Fill the Wells With Raspberry Preserves
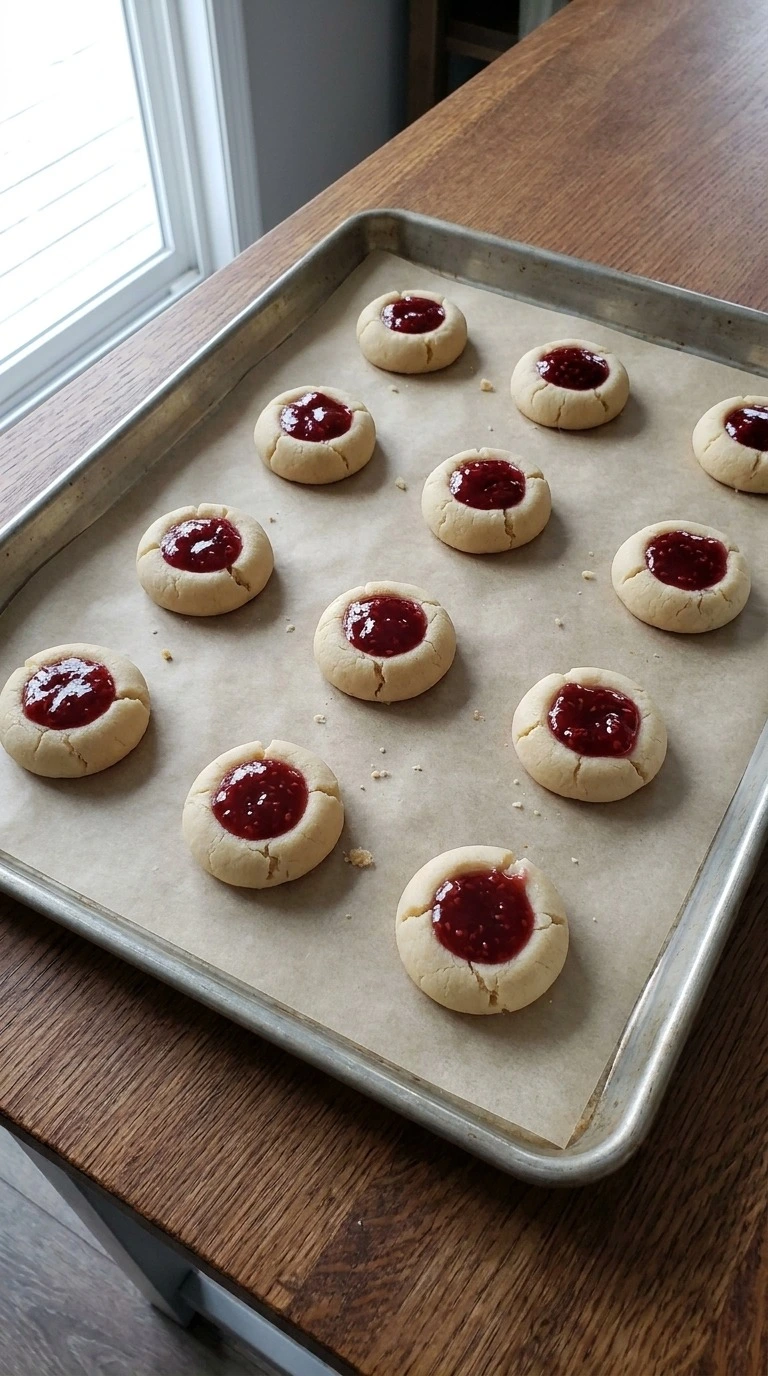
Take one chilled baking sheet from the refrigerator and leave the second tray cold. Stir the seedless raspberry preserves for 15 to 20 seconds until they’re smooth enough to spoon. Add about 1/2 teaspoon into each hollow. The jam should sit slightly below the edge of the dough.
Use the back of the spoon to settle the filling without spreading it onto the cookie tops. Finish filling the tray within 5 minutes so the dough stays firm. If a hollow has become shallow, press it again before adding jam. Overfilled centers may bubble onto the tray.
Now each pale cookie should have a glossy ruby red center. The preserves should look thick rather than watery. Keep the edges clear. Controlled filling prevents jam overflow during baking.
Tip: Pick thick seedless preserves rather than thin fruit sauce. Runny filling may soak into the dough and make the centers sticky.
Step 5: Bake the Cookies Until Lightly Golden
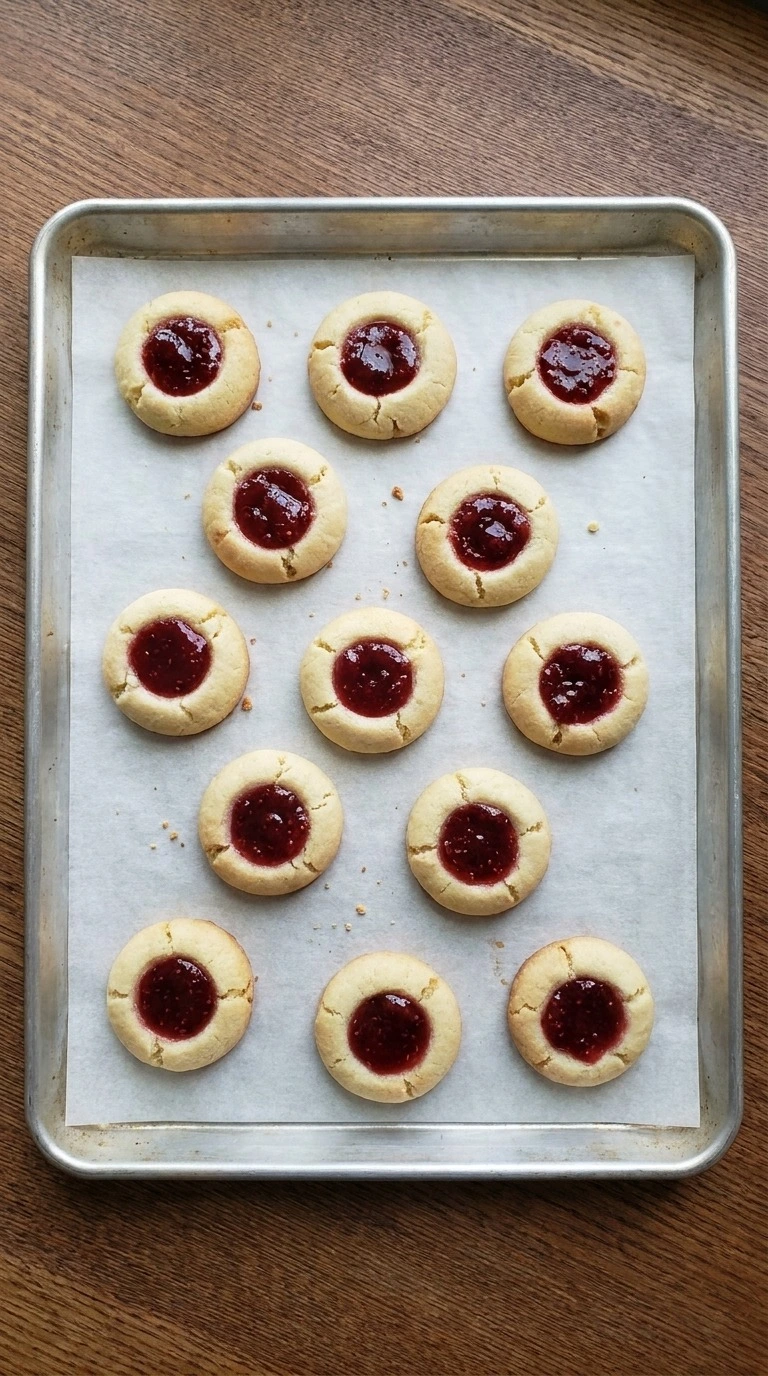
Preheat the oven to 350°F and place a rack in the middle. Bake the first tray for 12 to 14 minutes. Rotate it once around minute 8 if your oven heats unevenly. Watch the outer rims rather than the tops because thumbprint cookies should stay fairly pale.
The bottoms and edges should turn light gold while the raspberry centers become glossy and slightly set. Remove the tray before the tops become dark because longer baking can dry the shortbread. Repeat with the second chilled tray. Leave each batch on its baking sheet for 5 minutes before transferring the cookies to a cooling rack.
You’ll smell warm butter and vanilla as the edges begin to color. The jam may show tiny bubbles. Let the cookies cool for 30 minutes. Moderate oven heat sets the crumb without drying the center.
Tip: Use the middle oven rack for even heat. A tray placed too low may develop dark bottoms before the tops set.
Step 6: Cool and Arrange the Cookies for Serving
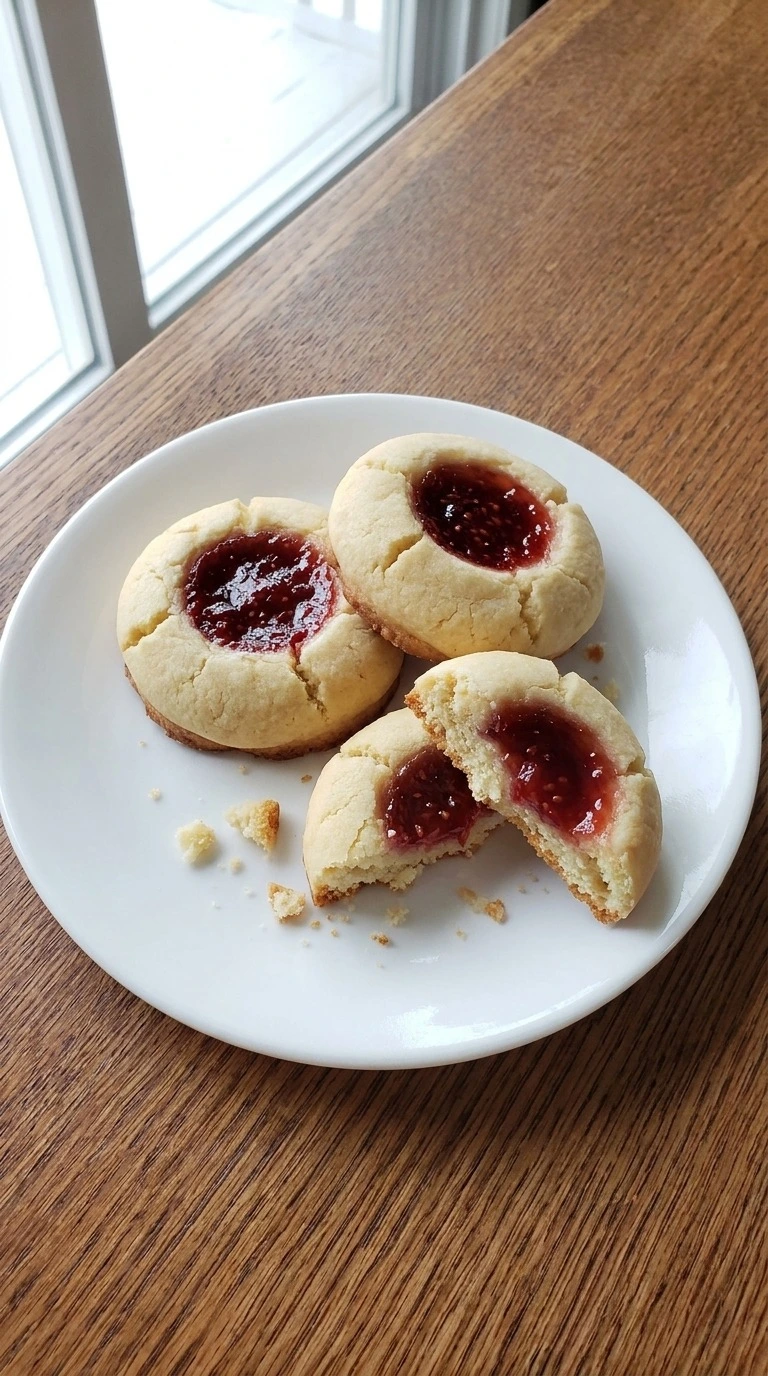
Let the baked cookies cool for 30 minutes before handling them. Then lift each one gently from underneath with a thin spatula. Arrange the full batch of 24 cookies on a serving plate in loose groups. Let a few edges overlap but keep the jam centers visible.
For individual servings, place 3 cookies on each small plate. Serve them around 68°F to 72°F for the softest buttery bite. Don’t stack them while warm because the jam may stick to the cookie above it. The centers should feel set when touched lightly.
Finally look for pale golden rims and glossy red centers with natural little ripples. Some cookies will have tiny cracks. That’s part of their charm. Cooling firms the filling and protects the delicate shortbread.
Tip: Place parchment between cookie layers when packing gifts. A box holding 12 cookies per layer helps prevent jam smears.
Pro Tips
- Soften the unsalted butter to about 65°F before mixing. It should bend under gentle pressure without looking greasy.
- Weigh 250 grams of all-purpose wheat flour rather than scooping straight from the bag because extra flour can dry the cookies.
- Use a half-teaspoon measure to press a 1/4-inch-deep well into each dough ball so the preserves stay centered.
- Keep shaped cookies chilled for 30 minutes at about 38°F before baking because firm butter reduces spreading.
- Choose thick seedless raspberry preserves and use only 1/2 teaspoon per cookie to avoid bubbling jam across the tray.
- Space the dough rounds about 2 inches apart on each baking sheet so they don’t touch as their edges spread.
- Check the cookie bottoms around minute 12 at 350°F. Remove the tray once the lower rims look pale gold.
- For a brighter fruit flavor, add 1/4 teaspoon of finely grated lemon zest to the jam before filling the wells.
- Replace the raspberry preserves with 1/4 cup of thick seedless strawberry preserves for sweeter red centers.
- Add 1 teaspoon of finely grated orange zest to the dough and use thick apricot preserves for a citrus version.
- Leave the wells empty during baking and fill the cooled cookies with 1/4 cup melted semisweet chocolate mixed with 2 tablespoons warm heavy cream.
- Divide the 1/4 cup of filling between raspberry and strawberry preserves to make 12 cookies of each flavor.
Substitutions
- unsalted butter: Replace 1 cup of dairy butter with 1 cup of dairy-free baking butter sticks. Choose sticks with at least 75% fat. The cookies may spread more and taste less rich. Chill the shaped dough for 40 minutes.
- all-purpose wheat flour: Use 250 grams of gluten-free 1-to-1 baking flour containing xanthan gum. This works for gluten free christmas cookies but the crumb may be more fragile. Rest the mixed dough for 10 minutes before shaping.
- large egg yolk: Replace the yolk with 1 tablespoon of unsweetened oat milk. The cookies will taste slightly less rich and may crumble more easily. Chill the dough for an extra 10 minutes if it feels sticky.
- seedless raspberry preserves: Use 1/4 cup of thick seedless strawberry preserves or apricot preserves. Strawberry tastes sweeter while apricot adds a mild tart note. For another dessert with a soft center, try our Soft Chocolate Chip Cookies.
- cornstarch: Replace 2 tablespoons of cornstarch with 2 tablespoons of additional all-purpose wheat flour. The cookies will be slightly firmer and less delicate. Check the edges after 12 minutes because the dough may feel drier.
Storage
Christmas Thumbprint Cookies keep well in an airtight container for 3 to 4 days at a cool room temperature when filled with shelf-stable raspberry preserves. Refrigerate them for up to 7 days if your kitchen is warm or your jam label requires it. Place parchment between layers to stop the sticky centers from touching. For longer storage, freeze the cooled cookies in a single layer for 1 hour.
Then pack them into a freezer-safe container with parchment between layers and freeze for up to 2 months. Let refrigerated cookies stand for 15 to 20 minutes before serving. Frozen cookies need about 1 to 2 hours to thaw while covered. Reheating isn’t necessary, but you can warm an unfrozen cookie at 275°F for 3 to 4 minutes.
Don’t overheat the jam because it may turn runny. Discard cookies with mold, a sour smell or other signs of spoilage.
FAQ
Yes. Shape the dough and refrigerate the unfilled rounds in a covered container for up to 24 hours. Add the raspberry preserves just before baking at 350°F for 12 to 14 minutes. If the wells flatten slightly while chilling, press them again before filling so the jam stays centered during baking.
These cookies keep their best texture for 3 to 4 days in an airtight container at a cool room temperature when made with standard shelf-stable preserves. Separate the layers with parchment so the jam doesn’t stick. Refrigerate them for up to 7 days if your kitchen is warm or the preserve label requires refrigeration after opening.
Yes, although the texture will change. Replace the egg yolk with 1 tablespoon of unsweetened oat milk and use 1 cup of dairy-free baking butter sticks. Chill the shaped dough for about 40 minutes before baking at 350°F because dairy-free butter can soften more quickly. Expect a slightly less rich flavor and a more delicate crumb.
Warm butter is a common reason the dough loses its shape. Chill the formed rounds for 30 minutes and press each center about 1/4 inch deep before filling. If the dough feels oily after shaping, refrigerate it for another 10 to 15 minutes. Also avoid overbeating the butter mixture because too much air can encourage spreading.
Yes. Double every ingredient to make approximately 48 cookies and divide the dough into 48 pieces weighing about 23 grams each. Bake the trays separately at 350°F for 12 to 14 minutes. Keep the remaining dough refrigerated while each batch bakes so the later trays stay firm and hold their thumbprint wells.
Yes. Cool the cookies completely and freeze them in a single layer for about 1 hour. Then transfer them to an airtight freezer-safe container with parchment between layers. Keep them frozen for up to 2 months. Thaw them covered at room temperature for 1 to 2 hours before serving so the jam doesn’t collect excess moisture.
These cookies taste lovely with warm milk, hot cocoa or mild black tea because the drinks balance their sweet raspberry centers. For a holiday gathering of 8 people, serve about 24 cookies with orange slices and another simple dessert. The fruit adds freshness while the pale golden shortbread gives the dessert spread a soft buttery texture.
In Sweden, thumbprint cookies are often called hallongrottor. The name means raspberry caves because each small shortbread cookie has a hollow filled with raspberry jam. Their bright red centers make them especially lovely on a holiday cookie plate.